how do i aim to build the technology of the future without already being a millionaire? is frugality overrated or insanely underrated?
AR
5/1/24

26/12/2024
Overview
in the past, i spoke about large scale prototyping with multiple different versions. i also mentioned that prototyping and creating a launch ready product would take anywhere between 1.5-2 crores. i wanted to be wrong, because that’s a lot of money. here’s the good thing,
i was.
for the last few months, i’ve been searching for methods to bring that number down. to make sure we can prototype and develop super quick, and super frugally. we eventually landed on what i’m going to write about now.
hot swapping has been around for decades, but it has never been looked at as a prototyping tool. hot swapping has always been an ease-of-use, end product feature. it essentially means adding or removing components to a system without it shutting down. this was originally a computer thing. very soon, people started using the phrase hot swapping for things like batteries. that turned into cold swapping, because you had to shut the system down.
hot/cold swapping is the pinnacle of modularity. how could something like this, something so simple and integrable not be used as a prototyping tool for more than just circuits?
in the past, our prototyping was going to revolve around multiple different units, all exploring different component placements, different ergonomic and weight adjustments and different materials used. think of about 10-15 variations of each, which would end up being a lot of different units. making them would also be incredibly expensive.
The New Method
instead of this, we figured out the constants for each prototype:
the components themselves
the overall assembly pattern
the optical module placement
then we broke down the different variables we’d change in every prototype.
component placement
ergonomic differences
weight distribution
vacuum chamber placement
so then we figured the easiest, quickest way to prototype would just be to separate the two. make one set of the constants and different sets of the variables.
Constants
this essentially means we’ll make just 1-3 sets of the PCB with the components, not solder them all of them on but instead mount them and give room for movement using enamel wires. the optical module and driver board will just be placed up top, with small lines of movement on the X and Y axis. that about does it for the constants. we only need to make 1-3 sets of the most expensive part of prototyping.
Optics
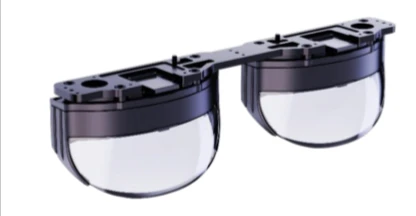
the optical module, the heaviest and most important part of the glasses. also the most expensive. this is the Phenix Optics Yao Birdbath Display module made by our Chinese partner vendors, Phenix Optics. this is the optical module the dawnView 1 will use in its final launch version. it uses 0.49 inch full HD 60 hertz Sony displays and is compatible with most current phones, laptops and other tech.

the driver board of the Yao Module, that allows us to Plug & Play from the prototype stage itself.
Chipsets
for the chipsets, we’re using the same Bluetooth MCUs (microcontroller unit) as the Even Realities G1, and a next gen version of what’s used in the Brilliant Frames.

this is the nRF5340 SoC by Nordic Semiconductors.
along with this, we’re using associated power management ICs, inertial measurement units (6 axis accelerometer), voltage protectors and 10v boosts. all incredibly light, power efficient and thermal efficient components.
Variables
as for the variables, we’ll use 3d printed casings along with empty spaces and metal weights to test weight distribution. every casing will be coated with a gel coat so it can be worn and touch the skin. each casing will be different on the outside but maintain the same dimensions on the inside, to allow the constants to fit. caps will be made, and there you go! completely modular prototypes, each conforming to the potential shape the final product will hold.
Component Placement
the components most viable to be moved around for ergonomic and weight distribution reasons are as follows:
Speakers
one on each side, mounted on minutely different parts of the PCB stems for understanding the best possible spot between audio calibration for the ear, weight distribution, and ergonomic fit.
using OTC generic speakers for the initial prototyping fit
replacing them with the USound Ganymede module for the final product
Capacitive Touchpad
only one touchpad on the glasses, on the right stem going from the start of the stem to the ear.
using OTC capacitive touchpads for the initial prototyping fit
replacing them with the Texas Instruments MSP Series module for the final product
not much scope for movement on the Y Axis, only movement will be on the left and right for determining ease of use
Camera
Only one camera for V1 of the dawnView, used for environmental recognition, translation, potential content capturing (per privacy norms)
placement will affect weight. if it is placed on the edge of the glasses, a counterweight will be needed on the other side in the form of either an LED indicator module or 3mm IR sensor for low light object recognition.
Battery
this is the toughest one to mount, primarily because of weight distribution concerns.
two rechargeable 140 mAh LiPo modules will be mounted on both stems, adding up to a total of 280 mAh split across both stems.
they will be placed at the back of the stems, to offset the weight added by the optical module up front.
Ergonomic Differences & Weight Distribution
there are multiple minute points of difference to ensure maximum ergonomic fit and extended wear comfort. they include
Temples
this is usually where the speakers are placed, and the point of most contact (surface area) between the glasses and your head. the blanket answer is to make them sleeker, but there may be merit to making the temples heavier to offset the top load of the optical module. this also means that the temples will be able to better grip the sides of your head, making it more comfortable to wear for longer periods of time. there will be at least 3-7 different temple weight, angle and shape differences in the casings we make.
Stem Ends
the stem ends have to be heavy enough to further offset the weight placed at the top. they can also be angled inwards to follow the curvature of the head. this will be great for support and fit, but may impede comfort if not done well.
the stem ends also have to hold the battery modules, which means they will definitely hold some weight.
along with this, one of the ends has to hold the usb c input port. the position of this input is something that greatly affects the ergonomics and comfort of wearing this for a long time, so this will also be different in the different casings. the position, placement and angle will have to be different to determine the most comfortable one.
now this next thing sounds strange, but keeps making more sense the more you think about it. hot swappable batteries. like removable batteries, but batteries you can switch out without opening up the unit. this of course is something that can be included in the next iteration, but is something i’d like to plan for nonetheless.
Front Frame
this is more aesthetic than ergonomic, but you could look at most of the other players in this space and see why it makes so much of a difference. current companies like XReal, Viture and TCL follow a very standard footprint of the frame shape, which is largely very ‘safe’. all of Rokid’s offerings have a very different take on the shape of their front frame, which ties directly into their own proprietary optical module. looks very cool. the Brilliant Frames have a very john lennon-esque look with the round lenses, and the Even Realities G1 look extremely sleek and minimalistic.
we have a slightly different look in mind. this is inspired mainly by the Oakley Frogskin Lites, and feature a half rimless design. this looks cool, but most of all it reduces the perceived weight of the unit. it essentially looks lighter.
pantoscopic tilt. this is essentially the angle at which the glasses sit on your face. the even realities G1 features an inward tilt, but their reason for doing so is different from ours. they’re using diffractive waveguides, which we aren’t (yet). by tilting the glasses inward, they eliminate ‘eye glow’ (a green glow on your glasses that show the person standing in front of you that you’re looking at something) for most angles. we’re not using waveguides, so our reason for doing this is more ergonomic. the angle at which your glasses sit impacts comfort, especially on your nose. along with this, an inward tilt makes the view box of the glasses more accessible in your vision.
Stems
pretty straightforward, the stems are the part the side of your head interacts with. they affect comfort and grip, something that can’t be not taken into consideration.
the angle at which the stems go on the side of your head (eg. does it run perpendicular to your head) determines how it would interact with the top of your ears, as that’s where it’ll rest.
stem length is also a huge factor which depends primarily on the components that’ll fit in there, and the way they fit in there. however, it’s not only the size of the components, but the proximity to each other along with the thermal emissions of each component.
different lengths with different shapes and angles will be tested out.
Vacuum Chamber Placement
heat will be a huge huge factor in making sure these are comfortable enough to be worn all day. there are a few ways of mitigating this, like using the right components and placing them in the right areas, installing vacuum chambers wherever needed or a combination of the two.
most of the components we’ve identified are made to work on low energy requirements, so they won’t get hot. the best way to heat proof the inside of a device is to use the right components. this us why we most likely won’t need to design our own vacuum chambers.
What does this mean?
we can now prototype and develop our final product for anywhere between 10 and 20 Lakhs. that’s it. that’s all it means. we’ve cut our prototyping costs potentially by 10x.
What does this make us?
we’re still a tech company, we’re still doing a lot of our own stuff. but in the first iteration, it means most of the components we use won’t be ours. there are people who’ve made fantastic speaker modules that we can use. there are people who’ve made fantastic optical modules that we can use. there are people who’ve made incredible camera modules, microcontroller units, power management ICs that we can use, and this makes our development process a lot easier. we won’t own the supply chain for now, sure, but we’ll still get a phenomenal product out there that actually solves people’s problems. and this is just for the first iteration.
we’ve already started designing our own exclusive optical module to be co-developed with our current optics vendor, we’re already designing accessory tech that can incrementally elevate the process of using our glasses. we’re constantly building, and we know what where we’re going. when the time is right, we’ll be owning our production process.
Why isn’t anyone else doing this?
simply put, because they don’t have to. when you have R&D budgets between millions and hundreds of millions, you don’t care about frugality. you have an almost infinite set of things you can try, with almost no repercussions. i thought that too. i thought we’d make a prototype, raise crores, then raise millions and boom. that’s our product. i’ve since realised that not only is that not how it works, that’s not how i’d want it to work. i want to develop frugally, because every action of mine means exponentially more than if i had a 100 millions dollars to develop one product. there is ownership and accountability every step of the way, and that’s why i know this will work.
Docs
https://docs.google.com/spreadsheets/d/1hMf-FNcB9x54c9ZIvaCzqF-STaRaf8_p5I6FFyy2VnI/edit?gid=0#gid=0
Send off
there’s still a lot to do. frugality does not make this process easier. but it makes sure that there’s no ambiguity, it makes us extremely intentional with our actions. i know what we’re doing, and i know what to do next. there is beautiful tech to be made, and beautiful tech to be used.
